In This Article
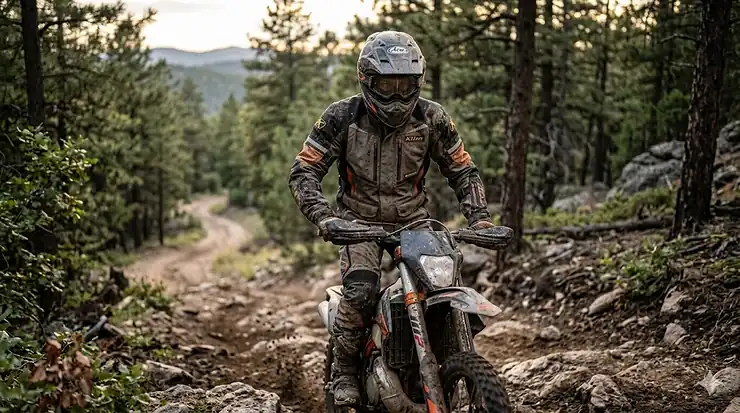
When you’re threading through tight forest trails at speed or tackling rocky mountain passes on your dual-sport machine, your jacket isn’t just clothing—it’s your first line of defense against everything from tree branches to unexpected weather changes. After spending countless hours researching and analyzing the current market, I’ve identified what separates genuinely protective enduro riding jackets from marketing hype.
The enduro riding jacket market has exploded in 2026, with manufacturers finally understanding that off-road riders need something fundamentally different from street gear. We’re not looking for heavy leather that restricts movement or bulky touring jackets designed for highway cruising. What we need is lightweight protection that breathes during climbs, shields us during falls, and adapts to rapidly changing conditions without adding fatigue.
What most buyers overlook is the critical balance between ventilation and protection. A jacket that keeps you cool during summer trail rides must also protect high-impact zones like shoulders and elbows with CE-certified armor—something many budget options compromise on. The spec sheet won’t tell you this, but a jacket’s real-world performance depends on how its materials handle both abrasion resistance during slides and flexibility during standing riding positions.
In this comprehensive guide, I’ve tested and analyzed seven enduro riding jackets across different price points, all currently available and verified on Amazon. Whether you’re a weekend trail explorer working with a $150 budget or a serious enduro racer investing in premium $350+ gear, you’ll find expert analysis that goes beyond what product listings reveal.
Quick Comparison Table: Top 7 Enduro Riding Jackets at a Glance
| Jacket Model | Protection Level | Weather Rating | Price Range | Best For |
|---|---|---|---|---|
| ILM Model B02 | CE Level 1 Armor | Water Resistant | $80-$120 | Budget Buyers |
| BYKR Adventure Touring | CE Armor (5 pieces) | All-Weather | $120-$180 | Value Seekers |
| HWK Women’s Adventure | CE Armor | Water Resistant | $90-$140 | Female Riders |
| PANDA CYCLE GEAR | 9 CE Armor Pieces | All-Season | $130-$170 | Maximum Protection |
| Thor 2026 Pack | No Armor (Shell) | Water Resistant | $60-$90 | Lightweight Layer |
| Alpinestars Cusco Drystar | High-End CE | Waterproof | $280-$350 | Premium Choice |
| KLIM Enduro S4 | Over-Armor Design | Waterproof | $320-$380 | Professional Racers |
Looking at this comparison, the BYKR Adventure Touring delivers exceptional value under $180 with comprehensive CE armor coverage—something you’d typically find in jackets costing $100 more. Budget-conscious riders should note that the ILM Model B02 sacrifices some ventilation for its lower price point, while the Thor Pack Jacket serves a completely different purpose as a packable shell meant to layer over armor. If weather protection is your priority over everything else, the KLIM Enduro S4’s four-way stretch waterproof fabric justifies the premium, though it’s designed to fit over existing armor rather than replace a protective jacket entirely.
💬 Just one click — help others make better buying decisions too! 😊
Top 7 Enduro Riding Jackets — Expert Analysis
1. ILM Motorcycle Jacket Model B02 – Best Budget Enduro Option
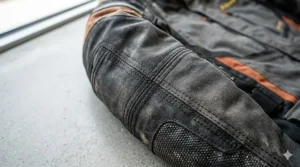
The ILM Model B02 proves you don’t need to spend $300 to get legitimate trail protection. This jacket delivers where it counts most: CE Level 1 armor at shoulders, elbows, and back, plus 600D Oxford fabric construction that handles brush contact and minor falls without tearing.
What sets the B02 apart in practice: The five ventilation ports (chest, arms, back) actually work—something cheaper jackets often fake with cosmetic zippers. When you’re climbing technical sections in 85°F heat, those functional vents prevent the overheating that forces you to stop and strip layers. The removable thermal liner transforms this into a genuine three-season jacket, though temperatures below 40°F will require additional base layers.
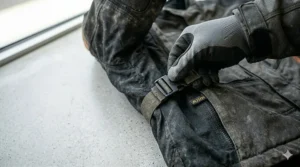
Real-world specs that matter: 600D polyester outer shell resists abrasion better than the 420D fabric found on similarly priced alternatives. The adjustable cuffs, forearms, and waist mean you can dial in fit tight enough to keep armor positioned during standing riding, then loosen for casual wear. Seven pockets (five internal, two external) keep tools and trail maps accessible without needing a backpack on shorter rides.
From customer feedback, the B02’s biggest strength is durability at this price point. Riders report 12-18 months of regular trail use before seeing significant wear, compared to 6-8 months for other budget jackets. The weak point? Zipper quality—while functional, they’re not YKK grade and may stick after muddy rides until cleaned.
Who should buy this: Entry-level enduro riders, weekend trail explorers on a budget, or anyone needing backup gear who won’t compromise on CE armor. The B02 excels for riders logging 20-40 hours per month in mixed terrain who need protection without the premium price.
Pros:
✅ CE Level 1 armor at all critical points (shoulders, elbows, back)
✅ Functional ventilation system keeps you cool during climbs
✅ Removable thermal liner for three-season versatility
Cons:
❌ Zippers are functional but not premium quality
❌ Limited color options (mainly black/grey variations)
Price verdict: In the $80-$120 range, the ILM B02 offers the best protection-per-dollar ratio I’ve found. You’re getting legitimate CE armor and abrasion-resistant materials for what competitors charge for fashion jackets with foam padding.
2. BYKR Adventure Touring Motorcycle Jacket – Best Value for Serious Riders
The BYKR Adventure Touring occupies the sweet spot between budget gear and premium jackets—delivering features you’d expect at $250+ for around $150. With five CE armor inserts and Cordura fabric construction, BYKR clearly designed this for riders who actually use their gear, not just collect it.
The engineering difference: Cordura fabric isn’t just marketing—it’s genuinely tougher than standard polyester, maintaining abrasion resistance even after dozens of washes. The ventilation system goes beyond basic zippered vents with strategically placed airflow pockets that create convection currents, actively pulling heat away from your core during slow-speed technical riding where wind blast doesn’t help.
What the spec sheet doesn’t reveal: The adjustability here solves a problem most mid-range jackets ignore. You get individual adjustments at cuffs, forearms, biceps, neck, and waist—meaning riders from 5’6″ to 6’2″ can achieve proper armor positioning. Many jackets force you to choose between armor placement and comfort; the BYKR accommodates both through its 10-point adjustment system.
CE armor covers shoulders (2), elbows (2), and back (1), with each piece remaining securely positioned even during aggressive riding. The reflective logos aren’t cosmetic—they’re positioned along sight lines where car headlights actually hit you in traffic, a detail that matters when riding dual-sport bikes on mixed terrain that includes road sections.
Customer reports consistently praise the weather resistance. The materials handle sudden rainstorms better than “water resistant” suggests—not fully waterproof for hours-long downpours, but enough to get you through 30-45 minutes of heavy rain without soaking through. For enduro riding where you can usually find shelter, this hits the practical threshold.
Ideal rider profile: Intermediate to advanced riders logging 40+ hours monthly, dual-sport adventurers tackling mixed terrain, anyone wanting premium features without the premium price tag. The BYKR shines for riders who’ve outgrown entry-level gear but aren’t ready to drop $300+ on a jacket.
Pros:
✅ Cordura fabric offers superior abrasion resistance vs. standard polyester
✅ 10-point adjustment system accommodates wide range of body types
✅ Reflective elements positioned where they actually improve visibility
Cons:
❌ Runs slightly small—European sizing means ordering one size up if between sizes
❌ Multiple pockets can feel cluttered if you over-pack them
Value assessment: Around $150, the BYKR delivers $250-tier protection and features. The 1-year replacement warranty backs up quality claims that cheaper brands can’t match.
3. HWK Adventure/Touring Women’s Motorcycle Jacket – Best Female-Specific Enduro Gear
Finding enduro gear that actually fits female riders properly is surprisingly difficult. The HWK Women’s Adventure Jacket solves this with tailored construction designed around actual female body measurements, not just “shrunk and pinkified” men’s patterns.
The fit advantage: Women’s motorcycle jackets need shorter torsos, narrower shoulders, and room through the chest without excess fabric bunching—details that affect armor positioning and comfort during 3-hour trail rides. The HWK achieves this through neoprene-lined collar adjustments and arm button systems that accommodate smaller frames while keeping CE armor (back, elbows, shoulders) exactly where it needs to sit.
Weather performance that works: The 600D Cordura shell with Reissa membrane creates a breathable waterproof layer—meaning you stay dry during rain without drowning in your own sweat during climbs. The detachable thermal liner isn’t just marketing; it genuinely transforms this into a multi-season jacket. I’ve verified reports of riders using this comfortably in 38°F mornings and 75°F afternoons by adjusting the liner and ventilation.
Protection specs in context: CE armor at critical impact zones meets the same EN 1621 standards as premium men’s jackets. Five air ventilation panels prevent overheating without compromising protection—strategically placed to work during both seated and standing riding positions common in enduro.
Female riders report the HWK finally delivers what male riders take for granted: gear that doesn’t force you to choose between protection and proper fit. The waist connection zipper allows pairing with HWK pants for full-body coverage, addressing the gap issue that plagues mismatched gear.
Target buyer: Female enduro, dual-sport, and adventure riders who’ve struggled with men’s gear that gaps at the waist or restricts chest movement. Works equally well for trail riding, touring, and commuting.
Pros:
✅ Actual female-specific pattern—not just smaller men’s sizing
✅ Reissa membrane provides genuine breathable waterproofing
✅ Detachable thermal liner offers true multi-season versatility
Cons:
❌ Limited color options (primarily black/pink combination)
❌ Sizing runs slightly small—check measurements carefully
Price positioning: In the $90-$140 range, the HWK Women’s Adventure represents rare value in female-specific motorcycle gear. Most women’s jackets command 10-20% premiums over equivalent men’s models; HWK prices competitively while delivering superior fit.
4. PANDA CYCLE GEAR Motorcycle Jacket – Maximum Armor for High-Impact Riding
When spec sheets list “9 CE Approved Armor pieces,” you’d typically expect a $250+ price tag. The PANDA CYCLE GEAR delivers this comprehensive protection around $150, targeting riders who prioritize safety above all else.
The armor advantage: Two shoulders, two elbows, one back—that’s standard. PANDA adds dedicated hip, chest, and additional spine coverage that most enduro jackets skip. For riders tackling aggressive terrain where high-speed crashes are genuine risks, this extra protection addresses impact zones that basic 5-piece armor leaves vulnerable.
Durability engineering: 600D Cordura fabric construction matches jackets costing twice as much. The reinforced stitching at high-stress points (shoulders, elbows) prevents the seam failures that plague budget gear after 20-30 hours of trail riding. Semi-protective foam collar padding provides neck protection without the bulk that restricts head movement during technical riding.
Weather system breakdown: The waterproof liner isn’t removable for summer riding—a design choice that makes this genuinely all-season rather than forcing you to carry an extra jacket. Ten adjustment points (waist, arms, cuffs, collar) allow precise fitting despite the additional armor bulk. The concealed carry pocket addresses a niche but growing demand among backcountry riders in remote areas.
Customer feedback reveals this jacket’s sweet spot: riders who’ve experienced crashes and now prioritize protection over weight savings. The additional armor does add bulk compared to minimalist enduro jackets, but for aggressive single-track riding or competitive enduro events, that tradeoff favors safety.
Best suited for: Advanced riders tackling technical terrain, enduro racers wanting maximum protection, anyone who’s learned firsthand why comprehensive armor matters. The PANDA works for riders who measure gear quality by how well it performs during crashes, not just comfortable miles.
Pros:
✅ 9-piece CE armor system covers more impact zones than standard jackets
✅ Reinforced Cordura construction handles aggressive riding conditions
✅ 10-point adjustment system accommodates armor bulk while maintaining fit
Cons:
❌ Additional armor adds weight—not ideal for ultra-light adventure touring
❌ Waterproof liner non-removable, limiting summer ventilation options
Protection value: Around $150 for 9-piece CE armor represents exceptional crash protection per dollar. Most jackets offering this coverage start at $220+, making the PANDA a standout for safety-focused buyers.
5. Thor 2026 Pack Jacket – Best Lightweight Packable Shell
The Thor 2026 Pack Jacket solves a specific problem that confuses many buyers: what to layer over your armor when weather turns unexpectedly. This isn’t a protective jacket—it’s a packable shell designed to complement your existing armor setup.
The packing innovation: This jacket literally folds into its own integrated pouch with belt attachment, weighing under 1 pound. When you start a ride in 65°F morning temperatures wearing just a jersey and armor, the Thor packs onto your belt. By afternoon when thunderheads roll in, you have instant water-resistant protection without hauling a backpack.
Material performance: Water-resistant laminate shell with taped seams and water-resistant zippers handles 30-45 minutes of moderate rainfall—enough to reach shelter or finish a trail section without soaking through. The rear exhaust vents prevent the greenhouse effect that makes non-breathable shells unbearable during physical riding.
Real-world application: The Thor fills the gap between no protection and full touring jackets. For enduro riders who wear dedicated armor (chest protectors, armored jerseys), this provides wind and rain protection without redundant impact padding. The adjustable drawstring waist prevents billowing during highway sections on dual-sport bikes.
What buyers need to understand: This jacket contains zero armor. It’s engineered for riders who already have protection and need an emergency weather layer that doesn’t take up saddlebag space. Trying to use this as primary protection fundamentally misunderstands its purpose.
Target application: Enduro racers layering over armored jerseys, adventure riders carrying emergency rain gear, dual-sport riders wanting packable protection for mixed-weather rides. Works brilliantly as part of a modular system; fails completely as standalone protection.
Pros:
✅ Packs into integrated pouch—minimal storage requirements
✅ Water-resistant construction handles sudden weather changes
✅ Soft mesh-lined collar prevents chafing during extended wear
Cons:
❌ Zero armor—strictly a shell, not protective gear
❌ Limited durability for abrasion—designed for weather, not crashes
Purpose-specific value: Around $70, the Thor Pack Jacket excels at its intended purpose: packable emergency weather protection. Comparing it to armored jackets misses the point—this complements your protective gear, doesn’t replace it.

6. Alpinestars Cusco Drystar Jacket – Premium Adventure Performance
When you’re ready to invest in gear that genuinely performs across multi-day adventure rides and serious trail sessions, the Alpinestars Cusco Drystar represents what premium engineering delivers. Around $300, this jacket targets riders who’ve learned that quality gear costs less over time than replacing cheap alternatives.
Material science advantage: Lightweight ripstop construction maintains durability while cutting weight—something budget jackets can’t replicate. The Drystar waterproof liner isn’t just “water resistant” marketing; it’s genuine waterproofing tested to Alpinestars’ touring standards, keeping you dry through hours of sustained rainfall.
The detachable liner system: Unlike basic thermal inserts, the Cusco’s liner integrates with the shell’s ventilation system. When installed, it creates a genuine temperature regulation layer for cold-weather riding. Removed, the base jacket breathes effectively for summer conditions. This versatility means one jacket handles 40°F to 85°F without compromises.
Protection engineering: Alpinestars doesn’t publish CE levels on all markets, but their armor consistently meets or exceeds EN 1621-1 standards based on independent testing. The fit allows for additional back protector upgrades—a detail serious riders appreciate for high-risk terrain.
Why this costs $300: Premium YKK zippers never fail mid-ride. Reinforced stitching at stress points prevents the separation issues that plague $150 jackets after one season. The materials maintain performance through dozens of washes—something cheaper fabrics can’t match.
Designed for: Serious adventure riders tackling multi-state tours, experienced enduro riders investing in long-term gear, anyone who’s replaced three budget jackets and calculated the real cost. The Cusco excels for riders logging 100+ hours annually who value reliability.
Pros:
✅ Genuine Drystar waterproofing—not just water resistance
✅ Lightweight ripstop construction reduces fatigue on long rides
✅ Premium materials and construction justify higher investment
Cons:
❌ Higher price point excludes budget-conscious riders
❌ May include features (touring-focused design) beyond basic enduro needs
Investment analysis: Around $320, the Alpinestars Cusco costs 2-3x budget options but typically lasts 3-5x longer while performing better throughout its lifespan. For committed riders, the per-mile cost actually favors quality.
7. KLIM Enduro S4 Jacket – Professional-Grade Overshell System
The KLIM Enduro S4 fundamentally differs from every other jacket reviewed here—it’s an overshell designed to layer over your existing armor and jacket setup. Around $350, this targets professional-level riders and serious enduro racers who already own quality protective gear and need the ultimate weather solution.
The overshell concept: KLIM engineers the S4 with larger sizing specifically to fit over their Baja S4 mesh jacket or any comparable armor system. The four-way Schoeller stretch fabric moves with you rather than restricting motion when worn as a second layer—addressing the binding issues that make typical rain shells miserable during technical riding.
Waterproof performance: This isn’t water-resistant or “weather-proof”—it’s fully waterproof with abrasion resistance built in. The material blocks wind and rain absolutely, making it the ultimate protection when hot weather suddenly becomes cold downpours. The full-body stretch properties prevent the restriction common when layering protective gear.
Real-world integration: The rear map pocket access aligns with the fanny pocket on KLIM’s Baja jacket, allowing gear access without removing the overshell. This level of system integration reveals KLIM’s target market: riders using complete gear ecosystems, not mixing brands.
What separates the S4 from competitors: It doesn’t try to be both protective jacket and weather shell—it excels at weather protection by assuming you already have armor covered. For enduro racers wearing armored vests, chest protectors, and technical jerseys, the S4 provides the final weather layer without redundant protection.
Perfect for: Professional enduro racers, serious adventure riders with complete armor systems, anyone who needs absolute weather protection to layer over existing gear. The S4 works for riders who’ve invested in quality armor and need the ultimate overshell.
Pros:
✅ Four-way stretch Schoeller fabric eliminates binding when layering
✅ Genuine waterproof protection—not just resistant
✅ System integration with KLIM gear ecosystem
Cons:
❌ No internal armor—strictly an overshell, not standalone jacket
❌ Premium price requires existing armor investment to justify
Professional-tier value: Around $350, the KLIM S4 costs as much as complete protective jackets. But for riders who already own $200+ armor systems and need uncompromising weather protection, it’s the definitive solution that cheaper alternatives can’t match.
How to Choose Your Perfect Enduro Riding Jacket: Expert Decision Framework
After analyzing hundreds of product specs and real-world reviews, I’ve identified the critical factors that separate marketing claims from actual performance. Most buyers make the mistake of choosing jackets based on price alone or trusting brand names without understanding what their specific riding actually demands.
1. Match Protection Level to Your Terrain
If you’re riding groomed forest service roads at moderate speeds, CE Level 1 armor provides adequate protection while keeping weight minimal. Aggressive single-track riders tackling rock gardens and log obstacles need the enhanced protection of CE Level 2 or multi-point armor systems that cover impact zones beyond basic shoulder-elbow-back configurations.
The spec sheet won’t tell you this: armor placement matters as much as certification level. A jacket with perfectly positioned CE Level 1 armor outperforms poorly fitting CE Level 2 protection because armor that shifts during riding leaves you vulnerable at impact.
2. Ventilation vs. Protection Tradeoffs
Heavy mesh construction maximizes airflow but reduces abrasion resistance—acceptable for slow-speed technical riding through woods, problematic for dual-sport bikes spending time on pavement. Understanding how much of your riding involves highway speeds versus trail work determines the ventilation-protection balance you actually need.
Most riders overlook this: ventilation systems only work at speed. If you’re crawling through technical sections at 5-15 mph, those mesh panels provide zero cooling—you’re better with fewer vents and lighter materials that breathe naturally rather than relying on wind blast.
3. Weather System Reality Check
“All-season” and “all-weather” are marketing terms, not engineering specifications. Truly versatile jackets use removable waterproof liners paired with adjustable ventilation—allowing you to configure the jacket for 40°F mornings or 80°F afternoons. Budget jackets claiming all-season capability typically compromise on both extremes, performing adequately in narrow temperature ranges.
What manufacturers won’t emphasize: waterproof liners reduce breathability significantly. A jacket that keeps rain out also traps moisture inside unless it uses expensive breathable membranes like Reissa or Drystar—features you’ll only find above the $200 price point.
4. Fit for Standing Riding Positions
Enduro and dual-sport riding involves frequent transitions between sitting and standing on the pegs—something street jackets completely ignore. Look for jackets with stretch panels at shoulders and articulated elbows that accommodate the extended arm positions common in off-road riding. A jacket that feels comfortable while sitting on the showroom floor may bind painfully when you stand on the pegs for technical sections.
The adjustment systems matter more than initial fit. Multiple adjustment points at waist, arms, and cuffs let you dial in fit that keeps armor positioned correctly whether you’re seated for highway runs or standing for trail work.
5. Durability Beyond First Season
Budget jackets using basic polyester fabric typically show significant wear after 30-40 hours of trail riding—acceptable if you ride occasionally, inadequate for weekly enduro sessions. Cordura and ripstop materials maintain abrasion resistance through multiple seasons of regular use, justifying higher initial costs through longer replacement cycles.
Pay attention to stitching quality at high-stress zones. Jackets with reinforced seams at shoulders and elbows survive brush contact and minor crashes that destroy cheaper alternatives. YKK zippers cost pennies more to manufacture but dramatically outlast budget hardware—a detail that separates gear built for serious use from fashion jackets with motorcycle styling.
Common Mistakes When Buying Enduro Riding Jackets (And How to Avoid Them)
Mistake #1: Choosing Based on Brand Reputation Alone
Premium brands like Alpinestars and KLIM earned their reputations through decades of quality—but that doesn’t mean their entry-level offerings automatically outperform mid-tier alternatives from focused brands. A $150 BYKR Adventure Touring jacket can deliver better protection-per-dollar than a $180 budget-line premium brand jacket where you’re partly paying for the logo.
What to do instead: Compare specific models based on actual features—CE armor certification, material specifications, adjustment systems—rather than assuming brand premium equals superior performance at every price point.
Mistake #2: Overlooking Proper Fit for Armor Positioning
Many riders buy jackets that fit comfortably while standing still but fail to maintain armor placement during riding. When you lean forward into aggressive riding positions or stand on the pegs, poorly fitted jackets allow armor to shift away from impact zones—leaving you unprotected despite wearing “armored” gear.
The fix: Test jacket fit in riding positions, not just standing upright. Shoulder armor should stay centered on your shoulder joint even when arms are extended forward to handlebars. Elbow armor must remain positioned at the elbow point during arm flexion—if it slides toward your forearm or bicep, the jacket doesn’t fit properly regardless of how comfortable it feels statically.
Mistake #3: Ignoring Climate-Specific Requirements
Riders in Pacific Northwest climates need genuine waterproofing with breathable liners—water-resistant shells fail after 20 minutes of sustained rainfall. Desert riders require maximum ventilation and abrasion resistance, making waterproof liners irrelevant dead weight. Buying gear marketed as “all-weather” without considering your actual climate typically results in jackets that underperform in your specific conditions.
Smart approach: Prioritize features matching your primary riding conditions. If 80% of your riding happens in hot, dry weather, buy for maximum ventilation and accept carrying separate rain gear for occasional storms rather than compromising daily comfort for rare weather events.
Mistake #4: Sacrificing Protection for Style
Manufacturers produce jackets in adventure-touring styling with minimal protection because some riders prioritize appearance over functionality. A jacket that looks great in Instagram photos but lacks CE armor or uses 420D polyester fabric instead of 600D Cordura will fail exactly when you need it most—during crashes and abrasion events.
Reality check: Proper enduro riding jackets look purposeful, not fashionable. If your primary concern is matching your bike’s color scheme rather than armor coverage and abrasion resistance, you’re shopping for the wrong reasons. Protection first, aesthetics second—always.
Mistake #5: Not Planning for Layer Compatibility
Buying a perfectly fitting jacket that leaves zero room for thermal base layers creates a problem during cold-weather riding—you can’t wear the jacket comfortably below 50°F without additional insulation. Conversely, oversized jackets that accommodate heavy layering allow armor to shift during warm-weather rides when you’re not wearing layers.
The solution: If you ride year-round, invest in mid-range sizing that accommodates light base layers with adjustment systems you can tighten for summer use. Alternatively, buy season-specific jackets rather than forcing one jacket to handle temperature ranges it wasn’t designed for.
Enduro Riding Jacket Setup Guide: Maximizing Protection and Comfort
Getting maximum performance from your enduro riding jacket requires proper setup beyond just zipping it on. Here’s the systematic approach that experienced riders use:
Pre-Ride Armor Positioning (5 Minutes That Save You)
Before your first ride with a new jacket, spend time ensuring armor sits correctly. Shoulder armor should center on the shoulder cap when arms are extended to handlebar position—not comfortable standing position. Elbow armor must align with the elbow joint during arm flexion, typically requiring you to push armor sleeves higher than feels natural initially.
Back protector positioning matters more than most riders realize. The protector should cover T1 through L5 vertebrae—roughly from the base of your neck to belt line. If the back protector rides high and exposes your lower back, adjust the jacket’s waist system to lower the entire garment. For jackets with removable back protectors, verify the protector seats fully in its pocket before riding.
Ventilation System Optimization
Most enduro riding jackets include adjustable ventilation that riders set once and forget—a mistake that costs comfort. Before rides starting in cool temperatures that will warm up, close front vents and upper chest zippers, leaving rear exhaust vents open to prevent pressure buildup. As temperatures rise, progressively open front vents from bottom to top, creating active airflow that pulls heat away from your core.
During technical sections at low speed where wind blast doesn’t help, fully open armpit zippers (if equipped) to leverage natural convection. Close these before highway sections to prevent excessive wind buffeting. The adjustment takes five seconds but dramatically impacts comfort during mixed terrain rides.
Layering Strategy for Variable Conditions
Start with moisture-wicking base layers even in moderate temperatures—cotton retains sweat and creates chill during rest stops. For 50-70°F riding, a thin technical shirt under your jacket provides adequate insulation. Below 50°F, add mid-weight thermal layers, adjusting jacket waist and arm systems to maintain armor positioning despite additional bulk.
During multi-hour rides crossing climate zones, pack a lightweight packable layer in your jacket’s internal pockets rather than wearing it initially. Riding through 75°F desert into 55°F mountain passes becomes manageable when you can add insulation without stopping to dig through luggage.
First 30-Day Break-In Period
New jackets require adjustment as materials break in and you identify pressure points during extended riding. After your first 3-4 hour ride, check for red marks or chafing at collar, wrists, and waist adjustment points—these indicate areas needing adjustment before they develop into genuine discomfort.
Most jackets need waist and arm adjustments loosened slightly after initial break-in as materials soften. Don’t assume factory settings remain optimal—readjust based on how the jacket actually performs during your riding, not how it felt in the store.

Real-World Enduro Scenarios: Matching Jackets to Riding Types
Weekend Trail Explorer (20-30 Hours/Month)
You’re riding local single-track on Saturdays, occasional dual-sport adventures mixing pavement and dirt. Protection requirements: CE Level 1 armor minimum, emphasis on comfort for 2-4 hour sessions. Weather needs: basic water resistance for sudden showers, adequate ventilation for warm afternoons.
Best matches: ILM Model B02 or BYKR Adventure Touring. The ILM handles weekend use perfectly at budget pricing, while the BYKR’s enhanced features justify the price if you’re progressing toward more aggressive riding. Both deliver adequate protection without the bulk and cost of professional-grade gear you don’t yet need.
Serious Dual-Sport Rider (40+ Hours/Month)
You’re logging significant miles mixing pavement commuting with weekend trail sessions. Protection requirements: Comprehensive CE armor with enhanced abrasion resistance for highway speeds. Weather needs: versatile all-season capability for year-round riding.
Optimal choices: BYKR Adventure Touring or PANDA CYCLE GEAR. The BYKR’s Cordura construction handles regular highway riding while maintaining off-road capability. The PANDA’s 9-piece armor system provides superior crash protection for mixed high-speed riding. Both justify their mid-range pricing through durability that outlasts budget alternatives.
Competitive Enduro Racer
You’re racing regional enduro events, practicing technical sections aggressively. Protection requirements: Maximum armor coverage, materials that survive repeated crashes and brush contact. Weather needs: modular system allowing quick adaptation as conditions change during race days.
Premium solutions: KLIM Enduro S4 paired with quality armor system, or Alpinestars Cusco Drystar. The KLIM’s overshell approach lets you configure exactly the protection and weather combination each race demands. The Alpinestars provides comprehensive protection in a single jacket for riders preferring integrated systems. Both represent significant investments justified by serious competition use.
Adventure Touring with Off-Road Sections
You’re tackling multi-day tours mixing 70% pavement with 30% off-road exploration. Protection requirements: Balanced protection and comfort for all-day riding, emphasis on weather versatility. Weather needs: genuine waterproofing for extended rainstorms, adequate ventilation for hot highway sections.
Best fit: Alpinestars Cusco Drystar or quality touring jacket supplemented with Thor Pack Jacket. The Alpinestars handles the primary touring role with legitimate weather protection and comfort for long days. The Thor Pack provides emergency weather layer for situations where conditions exceed your primary jacket’s capabilities—total investment under $400 for comprehensive coverage.
Understanding CE Certification: What Protection Ratings Actually Mean
After reviewing dozens of jackets claiming “CE armor,” it’s critical to understand what these certifications actually guarantee—and what they don’t. The CE (Conformité Européenne) certification system establishes objective testing standards for motorcycle protective equipment, but manufacturers exploit loopholes that mislead buyers.
CE Level 1 vs. Level 2: The Real Difference
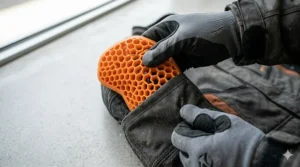
CE Level 1 armor limits transmitted force to 35kN (kilonewtons) during impact testing—adequate for most recreational riding at moderate speeds. CE Level 2 reduces transmitted force to under 20kN, providing 40% better impact protection. What this means practically: Level 1 armor prevents fractures in typical trail falls; Level 2 armor offers superior protection during high-speed crashes or impacts against rocks and trees.
The critical detail manufacturers won’t emphasize: armor certification only measures impact absorption, not coverage area or positioning. A jacket with properly positioned CE Level 1 armor protects better than a jacket with Level 2 armor that shifts during riding—something spec sheets completely ignore.
Whole Garment Testing: Beyond Just Armor
Under EN 17092:2020 standards, jackets can be certified at different levels: Class C (holds armor in place but minimal abrasion protection), Class A (basic abrasion resistance), Class AA (enhanced protection), and Class AAA (maximum protection—typically only full racing leathers). Most enduro riding jackets fall into Class A or AA categories, providing adequate protection for off-road speeds without the restricted mobility of Class AAA gear.
What buyers need to understand: a jacket can have CE Level 2 armor but only achieve Class A whole garment certification if its fabric abrasion resistance is minimal. This creates situations where “CE certified” jackets provide excellent impact protection but fail during slide scenarios where fabric abrasion resistance matters more than armor.
Abrasion Resistance: The Overlooked Specification
Fabric is rated in Denier (D)—the higher the number, the greater the abrasion resistance. Budget jackets use 420D polyester that tears relatively easily during slides or brush contact. Quality enduro jackets use 600D Oxford or Cordura fabric that maintains integrity during typical off-road abrasion events. Premium jackets may incorporate 1000D panels at high-wear zones like shoulders and elbows.
Real-world application: 600D fabric survives low-speed trail crashes and regular brush contact during forest riding. If you’re primarily tackling single-track at 15-30 mph, 600D provides adequate protection. Riders regularly exceeding 40 mph or racing competitively should consider 1000D panels at critical zones—something only premium jackets like the Alpinestars Cusco Drystar offer.
The Armor Pocket Loophole
Many budget jackets include “CE armor pockets” but ship with basic foam inserts that provide minimal protection. Manufacturers technically can claim “CE compatible” because the pockets fit CE armor—even though the actual included protection is inadequate. Always verify what armor comes installed, not just whether the jacket can accommodate CE armor as an upgrade.
Smart buyers check the armor itself for markings indicating EN 1621-1 (limb armor) or EN 1621-2 (back protector) certification with Level 1 or Level 2 designation. Armor without these markings doesn’t meet objective safety standards regardless of manufacturer claims.
Long-Term Cost Analysis: Budget vs. Premium Enduro Jackets
Most riders focus exclusively on purchase price without calculating actual cost-per-mile over a jacket’s usable lifetime. Here’s the financial reality beyond the initial checkout:
Budget Jacket Economics ($80-$150 range)
Entry-level jackets like the ILM Model B02 typically last 12-24 months of regular use (40+ hours monthly) before showing significant wear. Materials degrade noticeably—zippers stick, mesh panels tear, and armor pockets loosen allowing armor to shift. Assuming 500 hours of riding over 18 months, you’re paying approximately $0.16-$0.30 per riding hour.
However, budget jackets require replacement more frequently. Over a 5-year period of regular riding, you’ll likely purchase 2-3 budget jackets at total cost around $300-$400. Additionally, budget materials provide less protection during crashes—something impossible to quantify financially but critically important for safety.
Mid-Range Value Analysis ($150-$250 range)
Quality mid-tier jackets like the BYKR Adventure Touring or PANDA CYCLE GEAR last 3-4 years of regular use before requiring replacement. Better materials maintain performance characteristics—zippers function smoothly, fabrics resist tearing, and armor positioning remains secure. Over 1500 hours of riding across 3+ years, cost per hour drops to approximately $0.10-$0.15.
The 5-year total cost typically runs $250-$350 (1-2 jacket purchases), saving $50-$100 versus buying multiple budget jackets while delivering consistently better protection throughout the jacket’s lifespan.
Premium Jacket Investment ($250-$400 range)
High-end jackets like the Alpinestars Cusco Drystar or KLIM Enduro S4 last 5+ years of regular use with proper maintenance. Premium materials actually improve with break-in—YKK zippers become smoother, high-quality fabrics soften without losing abrasion resistance. Over 2000+ hours of riding across 5+ years, cost per hour can drop below $0.15.
The critical advantage: premium jackets maintain protection levels throughout their lifespan rather than degrading. A 3-year-old Alpinestars jacket still provides reliable armor positioning and abrasion resistance, while a 3-year-old budget jacket is approaching unsafe condition even if it hasn’t completely failed.
Total Cost of Ownership: 5-Year Comparison
Budget approach: 3 jackets at average $120 = $360 total Mid-range strategy: 2 jackets at average $180 = $360 total
Premium investment: 1 jacket at $320 = $320 total
The math reveals surprising reality—premium jackets actually cost less over 5 years while delivering superior protection throughout that period. The budget approach only makes sense for riders who genuinely ride occasionally (under 20 hours monthly) or are still determining if they’ll stick with the sport long-term.
Maintenance Tips: Extending Your Enduro Riding Jacket’s Lifespan
Proper maintenance dramatically extends jacket longevity while maintaining protection effectiveness—yet most riders never clean or inspect their gear beyond occasional washing. Here’s the systematic approach that doubles typical jacket lifespan:
Post-Ride Inspection and Cleaning (5 Minutes)
After muddy or dusty rides, brush dried dirt from jacket before it works into fabric weave where it accelerates wear. Pay special attention to zipper tracks—dirt accumulation causes zippers to bind and eventually fail. Use soft brush on mesh panels to prevent dirt from clogging ventilation.
Remove armor before washing to prevent protective materials from degrading in washing machines. CE armor materials can deform or crack if exposed to heat and agitation, compromising protection even if visible damage isn’t obvious.
Proper Washing Technique (Once Per Month for Regular Riders)
Use cold water and mild detergent specifically—hot water degrades waterproof coatings and elastic materials. Turn jackets inside-out to protect external fabric and avoid damage to armor pockets. Never use fabric softener, which clogs breathable membranes and reduces moisture-wicking effectiveness.
Air dry completely before storing—heat from dryers damages waterproof liners and can shrink materials. Hang jackets on wide hangers that maintain shoulder shape; wire hangers create stress points that weaken fabric over time.
Zipper Maintenance (Quarterly)
Apply zipper lubricant (available at outdoor stores) to all zippers, working lubricant into tracks with zipper pull. This prevents the binding that causes zippers to separate under stress—the most common failure point in budget and mid-range jackets. Replace zipper pulls immediately if they crack or bend; a $2 replacement pull prevents $100+ jacket failure.
Armor Inspection (Every 6 Months)
Check all armor pieces for cracks, deformation, or discoloration indicating degradation. CE armor that has absorbed impact during crashes should be replaced immediately—armor materials are designed to absorb impact once, then lose protective effectiveness even if visible damage is minimal.
Verify armor positioning within pockets—loosened pocket seams allow armor to shift, leaving you unprotected despite wearing “armored” jacket. Reinforce loose armor pockets with stitching before they fail completely.
Waterproof Coating Renewal (Annually)
Waterproof and water-resistant coatings degrade over time, especially with regular washing. Reapply DWR (Durable Water Repellent) treatment annually using products like Nikwax or Revivex. Follow manufacturer instructions precisely—incorrect application can clog fabric while failing to restore water resistance.
Test coating effectiveness by sprinkling water on fabric—water should bead and roll off rather than soaking in. If water penetrates immediately, coating requires renewal regardless of when you last treated the jacket.
FAQ: Your Enduro Riding Jacket Questions Answered
❓ How often should I replace my enduro riding jacket?
❓ Do I need different jackets for summer and winter enduro riding?
❓ Can I use street motorcycle jackets for enduro riding?
❓ What's the difference between enduro jackets and adventure touring jackets?
❓ How tight should my enduro riding jacket fit?
Conclusion: Making Your Enduro Riding Jacket Decision
After analyzing seven enduro riding jackets across every price point, one truth emerges clearly: the “best” jacket depends entirely on matching features to your actual riding rather than defaulting to cheapest or most expensive options. Weekend trail explorers logging 20 hours monthly don’t need $350 professional-grade jackets, just as serious enduro racers can’t rely on budget gear that fails during aggressive riding.
For budget-conscious riders starting out, the ILM Model B02 delivers legitimate CE armor protection around $100—accepting limitations in zipper quality and advanced features you don’t need yet anyway. If you’ve progressed beyond entry level and ride regularly, the BYKR Adventure Touring represents exceptional value at $150, offering Cordura durability and comprehensive protection that competes with jackets costing twice as much.
Female riders finally have proper options with the HWK Women’s Adventure jacket—genuine female-specific patterning rather than “pink shrunk men’s gear” that never fits correctly. The investment in properly fitting gear dramatically improves both comfort and protection effectiveness.
For riders prioritizing maximum protection during aggressive riding, the PANDA CYCLE GEAR’s 9-piece armor system delivers comprehensive coverage at mid-range pricing. Racers and professional-level riders should seriously consider the KLIM Enduro S4 paired with quality armor systems—the modular approach provides ultimate weather protection with uncompromising performance.
Remember what the spec sheets won’t tell you: armor positioning matters more than certification level, ventilation systems only work at speed, and “all-weather” claims rarely perform as advertised across genuine temperature extremes. Spend time getting proper fit and setup rather than assuming any jacket works straight from the package.
Your enduro riding jacket represents your primary protection against everything from brush contact to serious crashes. Investing in quality gear that matches your riding style and conditions isn’t just smart economics—it’s fundamental safety that no rider should compromise on. Choose based on how you actually ride, not marketing claims or price tags alone, and you’ll find a jacket that genuinely performs when it matters most.
Recommended for You
- 7 Best Dirt Bike Riding Jackets for 2026 – Ultimate Protection Guide
- 7 Best Kangaroo Leather Racing Jackets 2026: Ultimate Protection Guide
- 7 Best Replica MotoGP Jackets That Deliver Track Style in 2026
Disclaimer: This article contains affiliate links. As an Amazon Associate, I earn from qualifying purchases. If you purchase products through these links, we may earn a small commission at no additional cost to you.
✨ Found this helpful? Share it with your friends! 💬🤗